Getting Started with Tengri Chat: Install and Train Your Website AI
2026-10-11
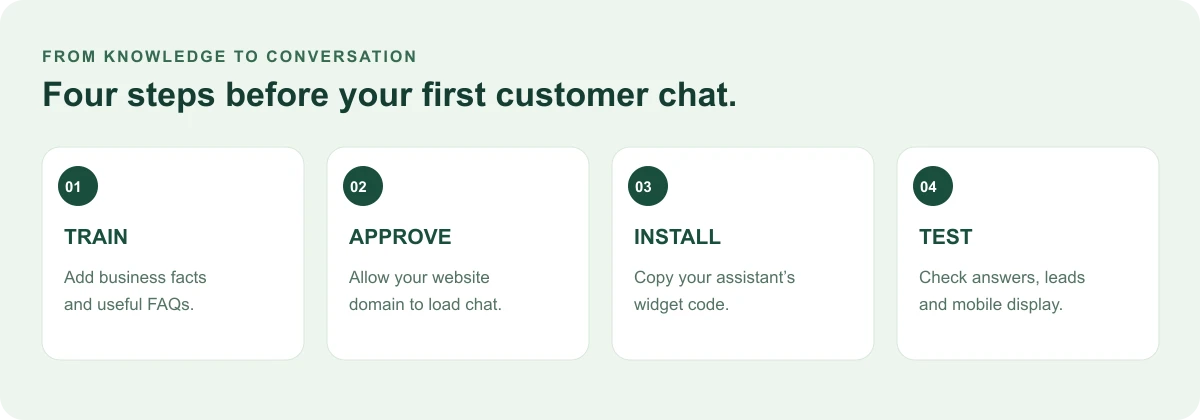
A website chat assistant is most useful when it can answer the questions your visitors actually ask: what you offer, how your service works, and what to do next. With Tengri Chat, the setup has three essential parts: prepare your business knowledge, approve the website that will use the assistant, and install the chat widget.
This guide walks through those steps and gives you a practical checklist for testing before customers start a conversation.
1. Prepare the answers your visitors need
Before configuring your assistant, collect a small set of accurate business facts. Start with your most common enquiries rather than uploading every document you have.
- Products and services: what you provide, who it is for, and any important limitations.
- Prices and availability: current published prices, opening hours, service areas, and booking requirements.
- Policies: delivery, cancellations, returns, and the steps a customer should follow.
- Contact details: the correct email, phone number, and destination for enquiries that need your team.
- Frequently asked questions: short answers to questions you receive repeatedly.
For example, a visitor asking about delivery needs a clear explanation of your actual service area and delivery process. A broad description such as “we offer excellent service” gives the assistant little useful information. Specific, current facts make the response easier to check and maintain.
Avoid adding customer passwords, payment details, or other private records to general business knowledge.
2. Open your account and configure the assistant
Create a Tengri Chat account, or log in if you already have one. Open the dashboard and select the assistant you want to configure.
In AI Assistant, add your website URL and configure the assistant for your business. In Knowledge, enter your business facts, policies, and FAQs, then select Save knowledge. Keep the information focused on the website this assistant will serve.
You can also use Train AI to import public website content. Enter your website URL and select Train AI. Review the resulting knowledge before relying on it for customer answers: an imported page may contain old prices, duplicate text, or information that is no longer relevant.
Training the same assistant again replaces its previous website extraction while preserving existing manual knowledge. Update the manual answers whenever your business information changes.
3. Approve your website domain
Open Installation and find Approved website domains. Add the domains where this assistant should load, one per line, without a page path. Save your changes.
If visitors use both the main domain and a subdomain, check the hostname of each page where you intend to display the widget and configure the appropriate approved domains within your plan allowance.
Domain approval and widget installation are separate steps. Adding a domain does not insert the widget into your website, and pasting the widget code does not automatically approve a domain.
4. Install your assistant's widget code
Still in Installation, select Copy code. Use the code generated for your own assistant; it contains the assistant identifier that connects website conversations to your account.
Paste it before the closing body tag on the pages where you want chat to appear. For a custom website, this is usually part of your shared page template or layout. For a website builder, use the platform's supported custom-code or footer mechanism.
After saving the website change, publish it through your normal website workflow. Then open the actual public page and check that the chat launcher appears. Checking only an editor preview may not tell you whether the public page is configured correctly.
If your website uses a strict Content Security Policy, the Installation screen explains which script, connection, and frame permissions are needed for Tengri Chat. Ask the person managing your website to make those targeted changes rather than disabling the site's security policy.
5. Test a complete visitor conversation
Start with a short test using facts from your saved knowledge. Ask about a service, a policy, and a question that your business information does not answer.
- Does the response match the current information you supplied?
- Does it give the visitor a useful next step?
- When information is missing, does the assistant avoid inventing an answer?
- If the visitor shares contact details, can your team find them with the conversation?
- Does the widget remain usable on a phone?
Review the conversation in your account. Correct inaccurate or incomplete business knowledge, save it, and repeat the relevant test before directing customers to the widget.
A request for a person flags the enquiry for your team; it does not automatically connect a live agent. Decide who will review these requests and how that person will contact the visitor.
Troubleshooting: the widget does not appear
Check the public page first. Confirm that your website change has been published, that the copied code belongs to the intended assistant, and that the page's domain is approved in Installation. Then check whether your website's security policy is blocking the script or chat frame.
If chat opens but the answer is inaccurate, review Knowledge and your imported website content. Repeating the installation step will not fix outdated business facts.
Add optional follow-up after the basics work
Tengri Chat offers WhatsApp lead alerts that can be configured separately. Set these up after you have tested your core chat and lead-review workflow, then confirm that the intended team receives the relevant alerts.
AI calling is another separate workflow. Active annual plans include access to the AI calling workspace, while calling credits are purchased separately. Calling also requires the relevant contact permission and sufficient credits. Installing website chat does not by itself start calls to your visitors.
For details, read the AI live chat overview, the AI calling guide, and the current plans.
Your launch checklist
Before making the assistant part of your customer workflow, confirm that business knowledge is current, website domains are approved, the widget is visible on your public pages, and test conversations reach your account. Assign someone to review enquiries and refresh the knowledge when services, prices, or policies change.
That gives you a practical starting point: a website assistant with relevant answers, a tested installation, and a clear process for your team to follow up.